Thanks for your support! If you make a purchase using our links in this article, we may make a commission. And, as an Amazon Associate, I earn from qualifying purchases. See the full disclosure here.
RV holding tanks are a pretty big deal to maintain properly which is why every RVer (or RVer-to-be) should learn how to flush and clean RV holding tanks.
In this piece, we’ll talk about the different types of RV holding tanks as well as the best methods (and products) for flushing and cleaning them.
What’s the Difference Between Black Water and Gray Water Holding Tanks?
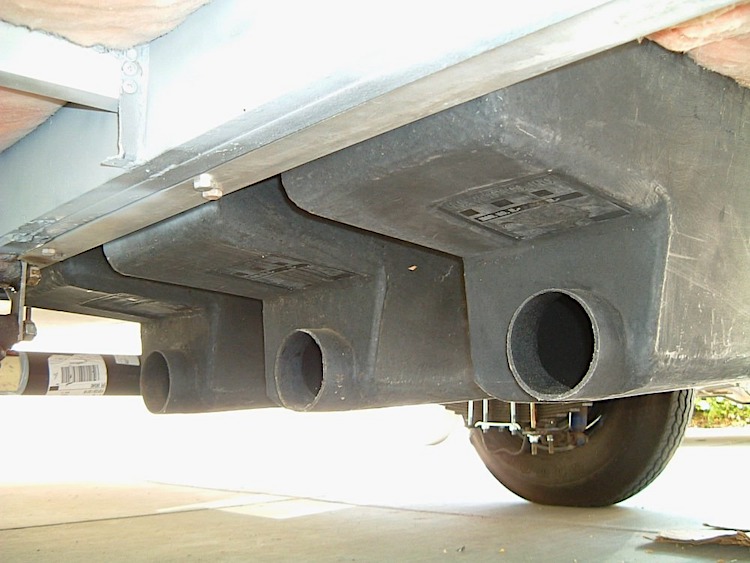
For the most part, there are two types of RV holding tanks; black water and gray water. Blackwater RV holding tanks are where sewage and otherwise “dirty” water is stored. Gray water holding tanks for RVs, on the other hand, is where the non-sewage water (such as the water from RV’s kitchen sink’s drain) is collected and stored.
Blackwater is definitely the more problematic holding tank as it contains raw sewage. For that reason, when flushing their tanks, many RVers save these bad boys for last. Some RVers even religiously flush their black water tanks and hoses with their gray water to help remove the blockage and unwanted leftover black water residue.
How Long Can You Leave Black or Gray Water in an RV?
Generally speaking, the black water tanks on RVs last for approximately 5 to 7 days while camping. For families, or groups, the tanks will last much less (closer to 2 or 3 days). However, your RV’s black tanks can be modified/extended to hold larger capacities.
Speaking of which, you should dump your black tank every 3 or 4 days to once per week when actively using your RV. Doing so more frequently doesn’t allow enough time for the solid waste to break down into more easily manageable (and drainable) sewage.
All things considered, the black water tank should be flushed each time the RV is moved. That means in between camping sites as well as before/after heading home from the road.
The gray water is another story. Gray water tanks are capable of storing fresh water for upwards of two weeks at a time. But, that really just depends on your RV, tanks, and water usage habits.
How Does RV Tank Flush Work?
Flushing an RV tank is a pretty simple task. That said, it is also one of the most intimidating and unpleasant for those unfamiliar with it. After you’ve flushed your tanks a few times it will become nothing more than a basic routine.
Here’s a run-down of how an RV tank flush works:
- 1. Drain your RV tank(s) at the dumpsite.
- 2. Remove debris/buildup from tank(s)
- 3. Add enough water to cover the bottom of your tank(s)
1. Drain The Tank
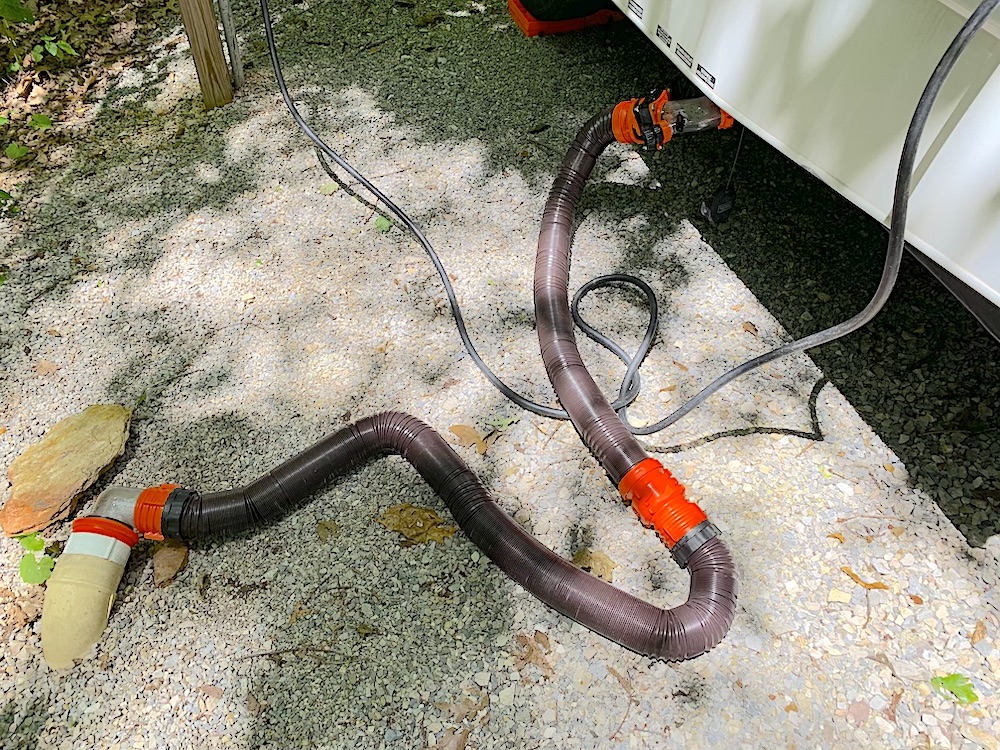
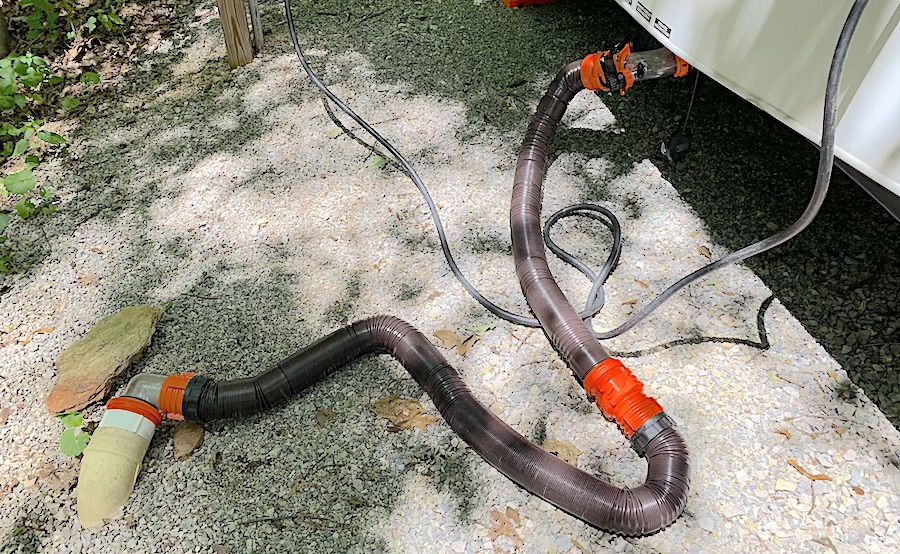
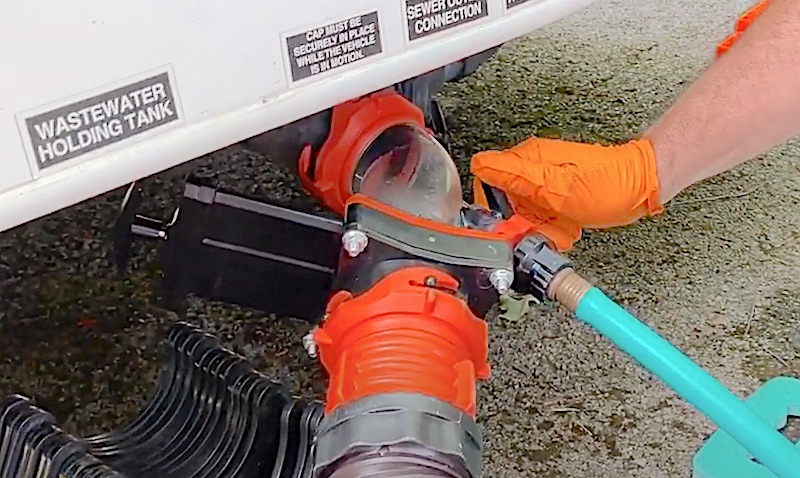
Connect your RV sewer hose to the dumping hole and the other end to the tank valve. Open the tank valve and allow the contents to flow into the sewer/septic.
It’s highly recommended to dump the black tank first, followed by the gray. The thought process is that the gray water helps to flush away some of the less than desirable black water debris and residue.
Keep in mind to dump your black tank when it’s at least halfway full (if not ⅔ of the way full). This allows waste and other solids to float and the liquids to drain properly. If you go to flush the tanks when the black tank is less than half full, be sure to add some extra water first.
2. Remove Debris/Buildup From Tank(s)
As lovely as it would be to merely dump your tanks and drive away, it isn’t quite that simple. When you flush your tanks, you need to perform some basic maintenance as well, including removing any debris or buildup that’s formed in the tanks.
You can do this in several different manners:
You Can Use a Macerator
A macerator uses high-velocity water pressure to shoot jets that clean the inside of the tanks and hoses to remove debris and build up. The macerator basically liquifies any waste or build-up and allows it to be drained out of the tank like water.
You Can Use a Flush Valve
Another great tool for taking care of your tank is a flush valve. These valves connect a flush valve barrel to utility or garden hoses and allow you to choose from “hose” or “tank” settings. Backflow prevention is built-in to flush valves so that your clean water hose/source is never at risk of being contaminated.
You Can Use a Tank Rinser
Tank rinsers come in two versions, one that can be set into your tank each time you flush it, and one that can be installed into your tank permanently. Permanent rinsers rotate in 360 degrees shooting water at high pressures while others come in wand-style hand-operated devices that connect to garden and utility hoses.
3. Add Enough Water to Cover the Bottom of Your Tanks
Tank flushing ends once you’ve dumped it, removed any debris or build-up, and filled up the bottom with water. This will help to keep your system functioning properly and avoid any damage.
Typically, four or five bowls of water will do the trick. Depending on the shape and size of your tanks, you may need to add more or less.
4. Treat Tank (Optional)
A fourth (and optional) step is treating the RV tanks you’ve just flushed. Treating tanks after dumping, flushing, and cleaning helps to prevent future buildup, clogs, odors, as well as accelerating break-down time for future waste stored in the tank.
The black tank should be treated as close to every time you dump it as possible. The gray tank, on the other hand, isn’t necessarily one that needs to treat each time you flush it.
Most tank treatments are quick and simple to use. That said, picking the best one can be a daunting task due to a large number of products on the market. Tank treatments that are enzyme-based, as well as formaldehyde-free, are the most preferred (as they are the safest and most efficient).
How Often Should You Flush Your Holding Tanks?
There is no correct number of times per year, or how often in general, you should flush your holding tanks. This number is based on multiple factors, such as how many people are using the tanks, and what size the tanks are, to begin with.
There is also the factor of how full you let your tanks get before you dump them. Many RVers swear by the 2/3s full rule, while others wait until their tanks are nearly completely full.
When traveling alone, or with one other person, you may get away with flushing your tanks once a week. If you’re RVing with a larger group, you may need to flush your tanks as much as every other day or so (or even daily).
Regular Maintenance Tips For Every Dump
There are a few maintenance tips to keep in mind each time you flush your tanks at a dumpsite:
- Make sure to wear some sort of protective gear such as rubber gloves or a face mask
- Every time you flush your tanks you should begin with your black tanks
- Take advantage of the soapy water from the gray tanks to clean black water residue
- Pack a spare (clean) hose along when you head to the dumpsite in case they don’t have any available
- Dump the black tank before the tank is over ⅔ of the way full
- Avoid using freshwater hoses for any type of black water tank or sewage hose rinsing
- Be courteous, if the dumpsite is busy, pull-off and let someone else dump while you treat your tanks
- Only dump tanks into the drainage pipes, and always clean up after yourself (leaving the site as clean, or cleaner, than you found it)
- Make sure to clan the black-water valve before returning to camp
Deep Clean Tips For Monthly Cleaning and Before Storing Your RV
Here are a few deep clean tips that’ll make your monthly cleaning easier (and when you go to store your RV as well):
- Dumping as often as possible will make your deep cleaning and pre-storage cleaning processes much easier
- Deep cleaning once per week (while using the RV) will also make your deep cleaning and pre-storage tank cleaning quicker and more efficient
- For the best deep cleaning results, dump your tanks and remove debris as you would normally, and then drain the tanks completely
- After tanks are drained, fill them around ¾ of the way full and add bleach (two cups should do it in most cases – make sure to keep the toilet lid closed to avoid harmful fumes)
- After approximately 5 to 10 minutes drain the tank again, refill it, and drain once more right away
- Repeat the process of filling the tank with freshwater and draining the tank until you see no debris or build-up is left and the bleach smell has also disappeared completely
- It is important to rinse all of the bleach away so that it doesn’t damage your plumbing system)
Pressure Washing and Backwashing Your RV Tanks
After cleaning your tank in the manner described above, you’re ready to pressure wash or backwash the inside of the tank. Doing so will break off, soften, and liquidate any debris or waste-matter. It is the final step to proper deep cleaning.
For the most part, this can be done two different ways; with built-in backwash systems or via an RV tank cleaning wand:
Built-In System Directions
If your RV comes with a built-in backwash system, most of the time it’s as simple as connecting a garden or utility hose to the proper connection and flipping on the propper backwash or pressure washing valve (located on your RV).
Be sure to have the water running while backwashing the RV tanks. When you notice that the drainage has become clear, and is debris-free, you’re finished with your deep cleaning.
Using a Wand
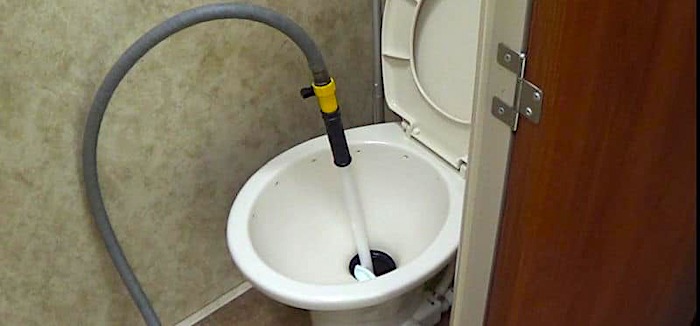
For RVers who’s rigs have no backwash equipment built-in, there are a large number of RV tank cleaning wands and pressure washers available on the market. Similarly to backwashing equipment, wands are attached to utility or garden hoses powered by water spouts at home or the camp/dumpsite.
To finish your deep cleaning with a wand, simply stick the wand down the open toilet lid and into the tank. Outside, have someone turn the water on, or turn it on yourself and then come back inside. Once the water is spraying from the wand, move it all around as to hit all of the nooks and crannies inside the tank.
Outside, again, someone should water the drainage until it is both free of debris and clear in color, at which point the job is finished.
How Do You Clean Holding Tank Sensors?
Depending on the model of your holding tanks, and their sensors, the process for cleaning them may slightly vary. At any rate, there should be instructions for cleaning the holding tank sensors available from the manufacturer or in the owner’s paperwork.
For many RVers, the most efficient way to clean the hold tank sensors (aside from actively preventing excessive and unnecessary build-up) is to flush the holding tanks themselves, apply a treatment, drive around, and flush the tanks again. Most of the time, this method will have your sensors degummed and working like new.
In the case that you’ve already attempted this standard technique for cleaning your RV holding tank sensors and they’re still not working, fear not as there are advanced methods for cleaning holding tank sensors as well (such as the ones mentioned above; wands, built-in backwashing equipment, and additional treatments and techniques).
All in all, a good deep cleaning of your RV holding tanks will clean the sensors better than anything. If you have done so, and the sensors are still failing to function, they may actually need replacing.
Can You Put Bleach in an RV Black or Gray Water Tanks?
Yes, you can put bleach into your RV black water and gray water tanks. That said, the amount of bleach and how often you should use it in each type of tank varies.
For black water tanks, many RVers mix anywhere from a few caps to a quarter of a cup of bleach with approximately a gallon of water. It is enough to get the job done, cleaning and sanitizing your tanks, but not enough to damage your plumbing or hoses. It is also safe to dispose of at the dumpsite.
Gray tanks can also be treated with bleach. One or two caps full of bleach can be added into the gray water tank for sanitizing purposes including reducing bacteria and odors.
Very thoroughly rinsing tanks after using bleach in them is highly recommended especially if you use a large amount (more than suggested above). High concentrations of bleach in your RV plumbing system can result in major damage.
How Long Can You Leave Black or Gray Water in an RV?
In regards to how long you can leave water in either your black or gray RV tanks, the time frames vary slightly.
For black water tanks in standard-sized RVs, liquids can be left for around five days tops. If you’re not camping alone, that number will be reduced by about a day per extra person.
Gray tanks, on the other hand, can hold and keep water fresh for up to 14 days at a time. Just keep in mind, this number has a lot to do with both the size and quality of your tank. Likewise, the quality of water you’re filling it with.
Do I Need to Use Black Water Tank Treatments?
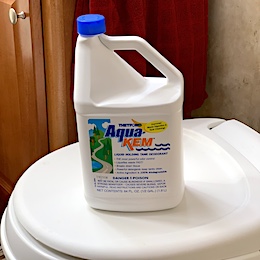
Black water tank treatments are pretty much a necessity. Some folks claim to deep clean their tanks each time they dump, and that it’s enough. However, many RVers don’t share this view. We use Aqua-KEM in our RV. It works great!
Most of us feel that black water tank treatments are essential for the sanitation of your RVs septic systems. Not only do they help reduce odors and blockages, but they also make regular maintenance your black tank just so much easier all around. And, they also keep your plumbing systems functioning optimally in the long run.
There are so many products on the market that you have plenty of options to choose from, including eco-friendly treatments as well.
What is the Best Black and Gray Tank Flush System?
If you’re looking for the best system for flushing RV holding tanks, we’ve got the perfect recommendation for you:
Rhino Blaster with Gate Valve
The Rhino Blaster utilizes a direct jet stream for rinsing and flushing your RV tanks and home sewer systems. It equips directly and securely to your RV sewer outlet with a swiveling bayonet fitting. A vacuum breaker prevents any dirty backflow into hoses.
Additionally, a see-through 45-degree elbow fitting lets water flow directly into the sewer system. This allows you to see when it becomes clear. The unit is long-lasting and rugged, built from damage-resistant polyethylene. Also, it has a universal fitting, so it will work for cleaning any RVs holding tanks with ease.
The Rhino Blaster is also available both with or without a gate valve depending on which you prefer/need for servicing your RV’s holding tanks, making the product even more versatile. However, we highly recommend buying the RhinoBlaster with the Gate Valve or it just won’t work the way you need it to.
Check out our YouTube video below to see how we use the RhinoBlaster on our RV!
A Final Word About Flushing and Cleaning RV Holding Tanks
Flushing and cleaning RV holding tanks are pretty standard stuff for regular RVers and the weekend warrior types alike. It has to be done, and cutting corners just creates a bigger job (and mess) in the long run. So, you might as well do it properly each time.
The good thing is it really isn’t so bad (other than the fact that, yes, you’re dealing with sewage). The steps for flushing and cleaning RV holding tanks, as outlined above, are simple and straightforward.
If you are still unsure about the best way to flush or clean your particular RV holding tanks, leave us a question in the comment section below and we’ll do our best to answer it as best as we can!

Great article! Thank you.
great videos thanks
Thanks Jane!