Thanks for your support! If you make a purchase using our links in this article, we may make a commission. And, as an Amazon Associate, I earn from qualifying purchases. See the full disclosure here.
People new to the RV lifestyle underestimate the importance of keeping their coach level. Campers have to be level for essential components to work correctly. We’ll show you how to install bubble levels on an RV or travel trailer to simplify the process.
We’ll show you the importance of keeping your RV level, how you attach a level to a camper, and where you put the levels on a travel trailer. We’ll also show you our favorite leveling products on the market. They include:
- Tri-Lynx Levelers Jack/Wheel Pads
- Tri-Lynx Stop ‘N Chock RV Wheel Chocks
- Camco Standard Bubble Levels
- Winnstry T Bubble Levels
- Camco EZ Level
- LIBRA Scissor Jacks
- Level Mate Pro
How Level Does An RV or Travel Trailer Need To Be?
One of our friends is restoring his 20-year-old Fleetwood Pace Arrow. His Class A motorhome came with a hydraulic jack system, but he spent the money to add an auto-leveling system to it. His reasoning dates back to the 80s with his parent’s travel trailer and pop-up.
As he explains it, his father was a perfectionist. While his mother and sister would sit comfortably in the car, his father would pull out the carpenter’s level and meticulously measure each corner of their travel trailer. He’d have our friend, who was old enough to do it, adjust the stabilizer jacks up and down until the RV was completely level.
The process took an hour and a half during one particular trip (although we suspect a little “campfire exaggeration”). When our friend bought his Pace Arrow, he wanted a project RV he could “hot rod” (his words) into the RV of his dreams for his full-time lifestyle. One of the first requirements was to install an auto-leveling system, so he never had to deal with the jacks ever again.
When he tells the story around the campfire, it’s always a hit. Today’s leveling technology makes the experience less complicated. The self-adhesive bubble levels that attach to your RV are very accurate, and many of the electronic versions show you a diagram of which stabilizer jack needs adjustment. Many RV models now have push-button electronic jacks instead of manual leveling, saving you from stressing your back.
Is Close Enough Really Good Enough When Leveling a Camper?
Once you reach your final destination campground, the desire to use shortcuts on the setup process may tease you to your bed or relaxing outdoor chair. In the RV world, shortcuts are the quickest way to disaster. It might not seem like a big deal, but there’s more to leveling your RV than things sliding off your tables and countertops.
Some of our RVBlogger friends and RV Camping for Newbies Facebook followers have talked about their refrigerators not working correctly. As we and others discussed the issue with them, the problem was their RV not being level.
RV refrigerators have a sloping absorption component that’s responsible for maintaining the temperature inside. If your coach isn’t level enough, the system’s flow won’t work, and you could lose all of your food. Your water tanks won’t read correctly, so you could end up cycling them when you don’t need to.
The bottom line is, you do need to level your RV every time you set up to avoid problems. If you have a Class A motorhome, fifth wheel, or a luxury travel trailer with auto-leveling, then it’s a matter of pushing a button. The system does all of the work for you.
Unfortunately, most RVs don’t have auto-leveling. Class B, Class C, and most teardrops don’t come with jacks as standard equipment. Leveling jacks can be added to these travel trailers as optional equipment. Many of the manufacturers of Class C RVs offer it as a factory-installed extra.
The Biggest RV Leveling Mistake: The Balanced Table Trap
Think of your RV as a tabletop that’s balanced on a pole in the exact center. If you put too much weight on one side or corner, the tabletop falls.
You could have a back corner level, but the opposite front could be too high or low. Factors like uneven ground and misaligned measurement devices make this possible. Having bubble levels or a device that monitors all four corners gives you the best chance for a real balance.
Having one corner misaligned from the other areas for some time puts a lot of stress on your RV frame and chassis. Repeated occurrences can snap screws, unbond glued sections, and cause other problems. It’s rare to see this happen, but an extreme case like this is easily avoidable with proper leveling.
How to Install RV or Trailer Bubble Levels
For the best results when installing bubble levels you’ll want to use the flattest surface you can. You must have your RV or trailer as level as possible BEFORE you install your bubble levels on your RV or camper trailer.
Your driveway is probably sloped so it may not be the best place to level up your RV, but it may be better than natural dirt spaces so use your best judgment. Once you’ve leveled your RV, then it’s the correct time to attach your bubble levels to your RV, 5th wheel, travel trailer, or motorhome.
When you balance your coach, level your RV with slide-outs in the in position. If you try leveling your RV with deployed slide-outs, it puts additional strain on your jacks. The jacks are fine once you find the best position. During the leveling process, you don’t want extra pressure and wear on your stabilizer jacks.
To get your RV or trailer level, you’ll need a carpenter’s level, wheel chocks, wheel blocks, and jack pads available. These leveling aides will be your best friends on the various terrains for future RV trips. Have someone assist you with the stabilizer jack adjustment as you monitor the carpenter level.
How Carpenter’s Levels and Bubble Levels Function: Inside the tool is a cylinder with a green or yellow liquid. There’s an air bubble inside, and the outer casing has marks on either side. As you move the tool around, the bubble will move from one side to the other.
To read the bubble level correctly, you want to place the level against the thing you wish to level. You’ll know you’re level when the bubble fits perfectly between the two marks on the cylinder. You may wonder how accurate is a bubble level? Even though it’s older technology, they are incredibly accurate.
Following this step-by-step guide will give you the best calibration on your leveling devices. Check out our Setup Checklist Video to see me level my RV.
4 Easy Steps to Level Your RV or Travel Trailer Prior to Installing Leveling Bubbles
1️⃣ Use Wheel Chocks
Use wheel chocks to secure your RV from rolling. Even if you have a motorhome with an engaged parking brake, wheel chocks give you that added layer of stability.
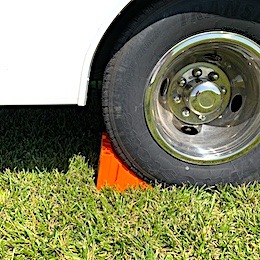
2️⃣ Use Leveling Blocks
For ground that’s uneven, you’ll have to reposition your RV to a place that’s more level. Using stackable RV pads that secure together like Lego® Bricks under one or all tires may be necessary. Pro Tip – we use bright orange Tri-Linx leveling blocks so we don’t forget them when we leave our campsite.
3️⃣ Use Stabilizer Jacks
Use the stabilizer jacks to level a trailer. You’ll first want to deploy them until they touch the ground. Place jack pads underneath their “feet,” so they have a solid surface to connect.
Once all four jacks are down, use your carpenter’s level to determine how each stabilizer jack needs to be adjusted.
4️⃣ Install Bubble Levels on RV or Travel Trailer
Now that you’re level, you can calibrate your leveling devices. Use the carpenter’s tool to position your RV leveling devices correctly on your coach.
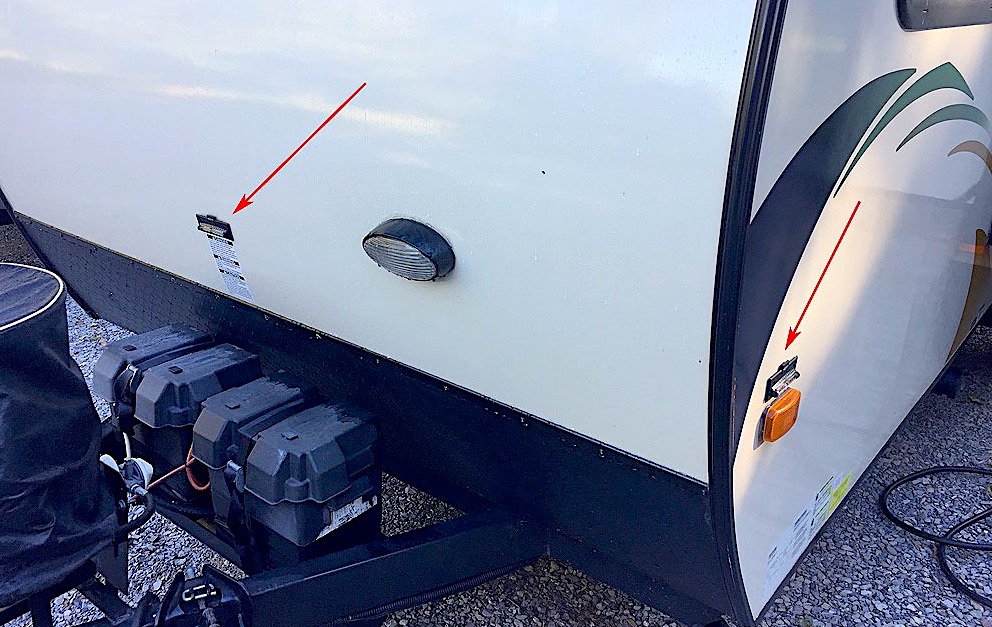
Many people will stick them in the back corner of their RV to get the side-to-side and front-to-back reading in one spot. A better, and more accurate location, is centered on the rear wall and sidewall.
The Best RV RV Leveling Devices
Here are some of the leveling products we use or recommend. Our recommendations come from expert advice and the feedback we’ve received from the many RVers we’ve come across.
Manual Use Products
- Tri-Lynx Levelers Jack/Wheel Pads (10 pack): The Tri-Lynx pads haven’t let us down. We purchased ours online, and they’re very affordable. Even stacked, they can hold up to 40,000 pounds, making RV weight a non-issue.
They lock together with their Lego® Brick configuration. Each pack comes with a nylon bag to store them in, so they don’t scatter all over your storage bay when you’re traveling. We recommend buying at least two sets to ensure you have enough of them.

- Tri-Lynx Stop ‘N Chock RV Wheel Chocks (2 Pack): Tri-Lynx made its chocks to work with their leveling blocks. You can interlock the chocks with the blocks (if you’re using them), and the chock creates a physical stopping point. The gripping treads built into the chocks stay in place, preventing your RV from moving.
- Camco Standard Bubble Levels (2 Pack): For those that want a simple, easy-to-use, Luddite method of leveling an RV, nothing beats a standard bubble level. These bubble levels come with waterproof self-adhesive backings that stick to your RV’s exterior wall. When the bubble fits within the designated lines, your RV is level. We recommend using at least two devices per side (one at each end, on all sides) for the most accurate readings.
- Winnstry T Bubble Level (5 Pack): Leveling a camper side-to-side is one aspect of leveling. Vertical leveling is just as important. This particular product isn’t adhesive, but they do come with two screws per device. You can use double-stick tape or weather stripping between your RV wall and the device.
- Camco EZ-Level: This four-legged electronic device is easy to use. Simply place it in the middle of your RV’s floor. Red indicates which side is low; green means its level. The goal is to have all four legs with a green light. The level automatically shuts off when not in use and stores well in your toolbox or another container.
- LIBRA Scissor Jacks (4 Pack): Whether you’re adding or replacing stabilizer jacks, scissor jacks are always preferred. Their design allows for the most weight, and they don’t slip since the center screw keeps them deployed.
When you use a stabilizer jack on a travel trailer, its only purpose is to keep the coach level and prevent it from rocking. They cannot support the RV’s full weight. For example, you can’t use them to change a tire on your camper.
Mobile Device Friendly Products
There are many apps and pairing devices that turn your mobile device into an RV leveler. Most are user friendly to level your travel trailer, and their accuracy is phenomenal.
- Smart RV Technology: Manufacturers like Jayco wire up their RVs to connect with mobile device applications. JAYCOMMAND allows RV owners to monitor holding tank levels, interior temperatures, and tire pressure. It also allows you to control the awning, lighting, and jack leveling.
Every manufacturer’s Smart RV app works a little differently. Some only show you your RV’s balance, and others work with the electronic jacks so you can adjust them through your mobile device. While you’re camping, you can always check your app to see if you need to readjust due to your RV settling.
- Level Mate Pro: THe Level Mate Pro is a wireless device that connects to your RV. Once you pair it to your mobile device via Bluetooth, you can see how your coach is balanced. The device becomes useful when you’re trying to find the optimal spot on the campsite that’s the flattest.
As you lower or raise your stabilizer jacks on your travel trailer, the app shows you multiple angles of your RV. As you make your adjustments, the RV diagram tilts on the screen. You’ll see red arrows pointing up or down with the measurement needed. Once all four sides are green, you’re all set.
The device has all the sensors contained in it, so setup is easy. The Level Mate Pro+ adds additional features like connecting to your SmartWatch and other features.
- RV Leveling App: Today’s cell phones and tablets have sensors inside that detect if they’re upright, sideways, laying down, etc. RV leveling apps for Apple or Android use those sensors to help you balance your coach. Some you can line up against your RV’s sidewall, and others you lay flat on the dinette’s table. Either way, you’ll get an accurate reading.
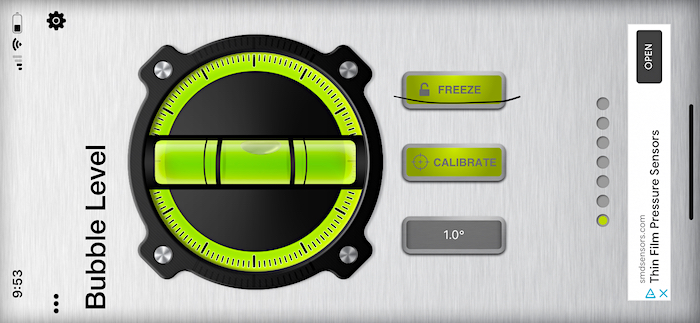
There’s not one particular app we recommend. Some like to use the virtual bubble level. Others prefer the RV diagram with the red arrows and measurement corrections.
Balancing Your RV Leveling Options
Leveling tools are a required accessory. Too much can go wrong if your coach isn’t balanced. Basic teardrop campers that don’t have refrigerators might get away with “eyeball” leveling, but do you really want to sleep on an angle?
When choosing your leveling device, pick something not only affordable but something that you’ll be comfortable using. More expensive RVs may want to invest in complex tools if they don’t come with manufacturer Smart apps.
If the leveling part of your setup takes a significant amount of time, either you’re overcompensating, or you need to readjust to find a better piece of ground. It should only take a few moments to get your RV balanced.
We hope you can use our RV and Travel Trailer Bubble Level Installation Guide to level up your camping experience!

Did I miss where you explain where the best place to determine if your rig is level is at? Kitchen floor, etc? The article seems to assume you’ve got it 100% level then install the leveling devices. How do we know we’re 100%? Can you explain that further? Thanks!
good article. thank you
Great article Mike & Susan, I’m a stickler for getting things level. Might try one of those apps.
Appreciate the advice & recommendations.
Thanks Dan,
Glad we could help!
Mike