Thanks for your support! If you make a purchase using our links in this article, we may make a commission. And, as an Amazon Associate, I earn from qualifying purchases. See the full disclosure here.
Published August 19, 2020 | Last updated June 24, 2026
Setting up an RV campsite can feel overwhelming when you are new to RVing. You pull into the site, the campground is busy, people are watching, and suddenly you have to remember where the water hose, sewer hose, electric cord, leveling blocks, wheel chocks, sewer hose, and campsite gear are all stored.
Susan and I remember exactly what that feels like. Susan had experience with a popup camper and travel trailer, but I was a tent camper before I discovered RVing. Before our first 10-day Class C RV rental, I watched videos, took an RV training course, and tried to learn as much as I could before we arrived at our first campground.
Even with that preparation, I remember thinking, “I wish I had a simple RV campsite setup checklist.” So we created this guide, video, and downloadable checklist to help new RVers set up their campsite with less stress.
This article walks through the basic campsite setup process we use, including how to inspect the site, park the RV, level and chock the wheels, connect electric, hook up fresh water, connect the sewer hose, and set up the outside living area.
Important: Every RV is a little different. The steps below are based on how we set up our Class C motorhome, but most of the same ideas apply to travel trailers, fifth wheels, Class A motorhomes, and other RVs. Always follow your RV owner’s manual and manufacturer instructions for your specific rig.
RV Campsite Setup Video for Beginners
In the video below, we show the six basic steps we follow when setting up our RV campsite. The video covers electric, water, sewer, leveling, campsite gear, and the setup checklist.
Click the RV setup checklist below to download it for free.
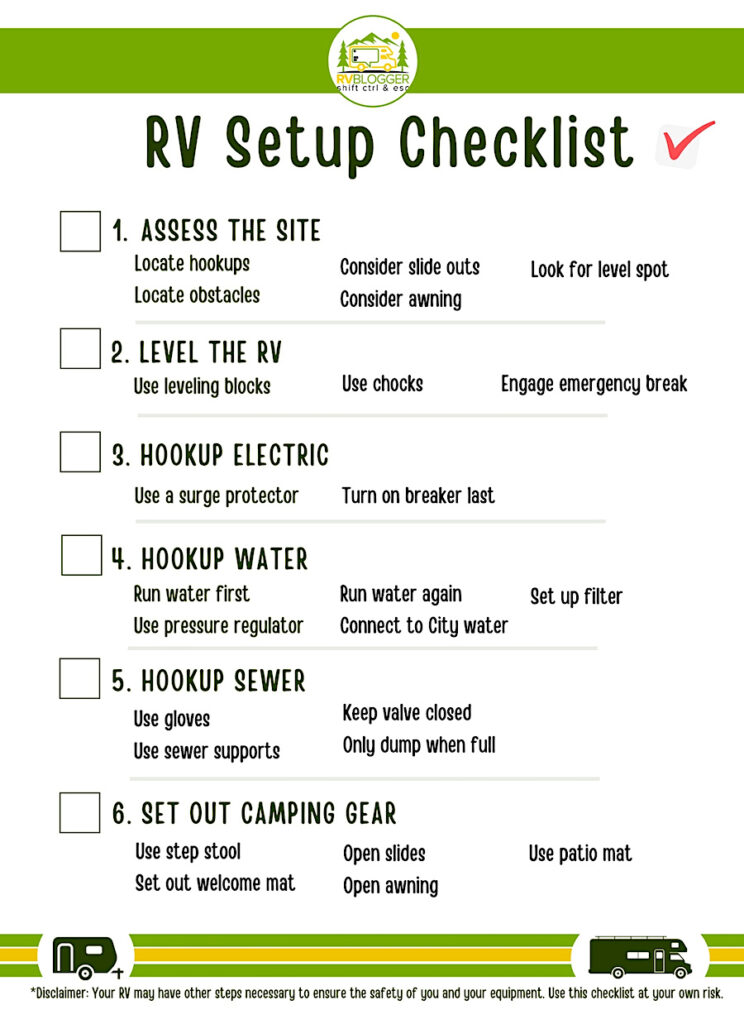
Quick RV Campsite Setup Checklist
- Walk the campsite before pulling in or backing in.
- Check the location of the electric, water, and sewer hookups.
- Look for low branches, stumps, rocks, picnic tables, fire rings, and slide-out clearance.
- Position the RV so your hookups can reach without stretching hoses or cords.
- Level the RV before putting out slides.
- Chock the wheels before fully settling in.
- Connect electric with a surge protector or EMS.
- Flush the campground water spigot before connecting your fresh water hose.
- Use a water pressure regulator and drinking-water-safe hose.
- Connect the sewer hose carefully and keep the black tank valve closed until it is time to dump.
- Set up your awning, chairs, mat, grill, and outdoor gear last.
Step 1: Walk the Campsite Before You Park
Before you back in or pull through, take a minute to walk around the campsite. This is one of the simplest things you can do to avoid problems.
Look at where the electric pedestal, water spigot, and sewer hookup are located. Then check for low tree branches, uneven ground, rocks, stumps, picnic tables, fire rings, posts, and anything else that could get in the way.
Also think about how your door, awning, and slide-outs will line up with the campsite. In our video, we noticed the side door was too close to a stump, so we backed up a few more feet. That is much easier to fix before you start leveling, chocking, and connecting everything.
Step 2: Back In and Position the RV
If someone is traveling with you, use them as a spotter. Susan usually gets out and helps guide me into the campsite. We like using our cell phones so we can talk calmly instead of yelling back and forth through the window.
A wireless backup camera can also make campsite parking much easier. Between a good spotter and a backup camera, it is much less stressful to get the RV positioned where you want it.
Once you are in the site, walk around again before you commit. Make sure your sewer hose can reach, your water hose can reach, your power cord can reach, your slides have room, and your awning can open without hitting branches.
Step 3: Level the RV and Chock the Wheels
After the RV is positioned, level it before you put out the slides or finish setting up camp. Some RVs have automatic levelers, which makes this step easy. If yours does not, leveling blocks work well.
We use a simple level to check side-to-side and front-to-back. Some people use a small bubble level, while others use a phone app. Either way, the goal is to get the RV reasonably level so the refrigerator can work properly, doors open and close correctly, and the RV feels comfortable inside.
Once the RV is level, chock the wheels. Chocking is especially important for travel trailers and fifth wheels, but motorhome owners should use wheel chocks when appropriate too. If you have a tandem-axle travel trailer, X-chocks between the tires can also help reduce movement.
Step 4: Connect the Electric First
We like to connect electric first after the RV is parked, level, and chocked. That lets us turn on the air conditioner, lights, and other systems. It can also help if you need power for slide-outs, especially if your batteries are low.
Before plugging in, make sure the breaker on the campground pedestal is turned off. Then plug in your surge protector or electrical management system. A good surge protector can help protect your RV from power surges, miswired pedestals, and low voltage.
Low voltage is one problem many new RVers do not think about. Older campgrounds can sometimes have weak power, and low voltage can be hard on RV appliances and electric motors over time. If your surge protector or EMS shows an error, do not ignore it. Contact the campground before plugging your RV directly into the pedestal.
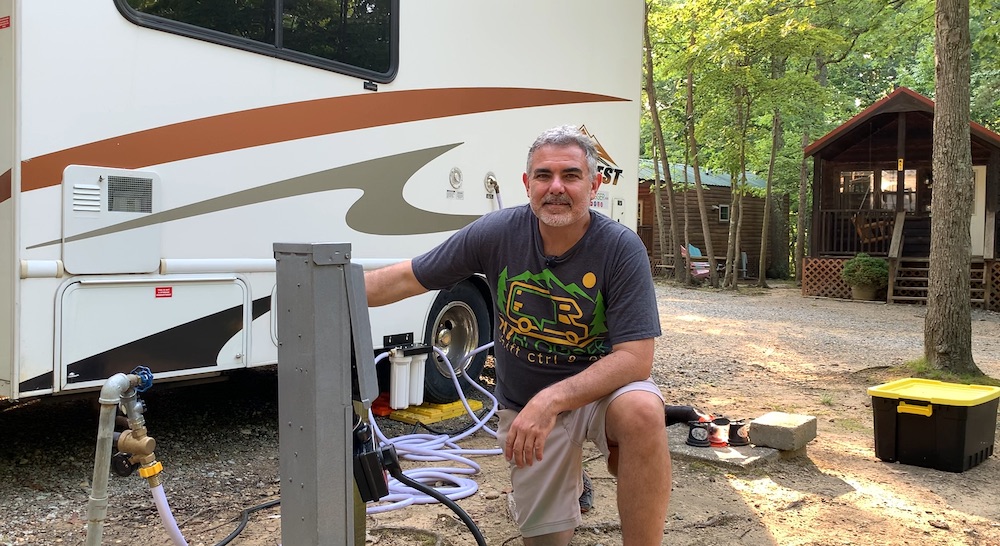
Step 5: Hook Up the Fresh Water
Do not connect your fresh water hose to the campground spigot without flushing the spigot first. Turn on the water and let it run for a minute or two. You may see dirty-looking water at first because rust, sand, silt, and sediment can collect in the campground water lines.
Flushing the spigot helps keep that sediment out of your filter, hose, and RV plumbing. It only takes a minute and can help your water filter last longer.
After that, we like to connect a splitter, then a water pressure regulator, then a drinking-water-safe fresh water hose. A pressure regulator is important because campground water pressure can be too high for RV plumbing. Many RVs are designed to operate somewhere around 40 to 60 PSI, but always check your RV’s recommendations.
We also recommend using a water filter. In our own RV, we use a two-stage filter system, but even a basic RV water filter is better than nothing. Before connecting the hose to the RV, flush the hose and filter so old water and trapped air do not get pushed straight into your RV plumbing.
New RVers should also know there are two different ways to get water into an RV. The city water connection supplies water directly to your plumbing when you are hooked up at a campground. The fresh water tank holds water so you can use your water pump when you are boondocking or camping without hookups.
When you connect to city water, it should not fill your fresh water tank. If your fresh water tank starts filling while you are connected to city water, something may be wrong with your plumbing or water pump check valve.
Step 6: Connect the Sewer Hose
If you have a full-hookup site, the sewer connection is next. We keep all of our sewer gear in a separate plastic box so it does not touch our fresh water gear, electrical gear, or camping supplies. Sewer equipment should always stay separate.
Use disposable gloves, connect the sewer hose securely to the RV, and then connect the other end to the campground sewer inlet. A clear elbow, sewer donut, and hose support can make the job easier and cleaner.
Try to create a downhill path from the RV to the sewer inlet. If the campground connection is a little awkward, you may need to adjust the hose support or lift the hose carefully when dumping so everything drains properly.
One of the most common beginner questions is whether to leave the black tank valve open while camping. We do not leave the black tank valve open. Keep the black tank valve closed until the tank is at least partly full and you are ready to dump. If you leave it open, liquids can drain out while solids stay behind, which can create clogs and odors.
The gray tank is different. Some RVers leave the gray tank valve open while camping at a full-hookup site. But before you dump the black tank, it is helpful to have gray water available so you can dump the black tank first, then dump the gray tank to help rinse the sewer hose with soapy water.
Step 7: Set Up Your Outdoor Camping Gear
Once the RV is level, chocked, powered, connected to water, and hooked up to sewer, then it is time for the fun part: setting up the outside living area.
Before opening the awning, check again for tree branches or anything overhead. If it has been raining, remember that water can collect on the awning and spill when you open it.
After that, set out your outdoor mat, chairs, table, grill, lights, dog gear, and anything else that makes the campsite comfortable. Keep walkways clear so no one trips over hoses, cords, stakes, or gear.
Essential RV Campsite Setup Gear
Every RV setup is a little different, but these are the basic items most new RVers should carry:
- Surge protector or electrical management system
- Drinking-water-safe fresh water hose
- Adjustable water pressure regulator
- RV water filter
- Water hose elbow
- Sewer hose kit
- Clear sewer elbow
- Sewer hose support
- Disposable gloves
- Separate sewer gear storage box
- Leveling blocks
- Wheel chocks
- Outdoor mat
- Flashlight or headlamp
- Basic RV tool kit
We keep a list of the RV gear we personally use on our RVBlogger RV Gear page. If you are just getting started, focus first on water, sewer, electric, leveling, and safety gear. The fun campsite accessories can come later.
Common RV Campsite Setup Mistakes
- Backing in before walking the campsite.
- Parking too far from the hookups.
- Forgetting to check slide-out or awning clearance.
- Putting slides out before leveling the RV.
- Forgetting to chock the wheels.
- Plugging in without using a surge protector or EMS.
- Not flushing the campground water spigot before connecting.
- Skipping the water pressure regulator.
- Mixing fresh water gear and sewer gear together.
- Leaving the black tank valve open all weekend.
- Setting up chairs, mats, and decor before the RV is fully positioned.
Why Use an RV Setup Checklist?
RV setup checklists are not just for newbies. They help experienced RVers too. When you are tired from driving, arriving after dark, dealing with rain, or trying to set up quickly, it is easy to forget a step.
A simple checklist gives you a repeatable process. You do not have to remember everything from scratch each time. You just follow the steps, make sure the RV is safe, and then relax.
Our checklist is intentionally simple. It will not cover every possible RV or every special situation, but it will help you think through the main steps: parking, leveling, electric, water, sewer, and campsite gear.
Want More RV Training?
If you are brand new to RVing and want more detailed training, we recommend checking out our RV Training Courses page. We have used RV training ourselves, and it can be a huge help when you are learning how to operate and care for your RV.
Final Thoughts About Setting Up Your RV Campsite
Setting up your RV campsite gets easier every time you do it. The key is to slow down, walk the site first, follow the same order each time, and use a checklist until the process becomes second nature.
Once your RV is parked, level, chocked, connected, and safe, then you can put out the chairs, open the awning, and enjoy the campground.
Join Our Facebook Group: RV Camping for Newbies
RV Camping for Newbies is not just for newbies. It is for anyone interested in learning more about RVing.
- Ask questions and get answers from other RVers.
- Learn tips, tricks, and camping ideas.
- Find campground recommendations.
- Meet other people who enjoy RVing.
Related Reading:
- I Melted My RV Surge Protector (And My Power Cord) Here’s What to Buy Instead
- How to Store an RV Water Filter Between Trips
- RV Black Tank Cleaning Tips to Eliminate Odors Fast
Mike Scarpignato – Bio
Mike Scarpignato founded RVBlogger.com with his wife, Susan, in 2018 to help new and experienced RVers make better decisions about buying, owning, and traveling in an RV.
Mike has decades of camping experience and has traveled extensively in both a Gulf Stream Conquest Class C and a Thor Challenger Class A motorhome. He and Susan spend much of the year on the road, attend RV shows, visit dealerships, and tour RVs across the country.
Through RVBlogger.com and the RVBlogger YouTube channel, Mike shares practical, first-hand advice about RV buying, floor plans, ownership, maintenance, gear, campgrounds, and the RV lifestyle.

On your video you recommended using a surge protector at camp sites for lightning and as camp sites may not give quite enough electricity to your appliances and you don’t want to ruin them over time. If I hooked my generator up to my regular home outlet using an adapter (for 30), do you think that’s the same thing and would using a surge protector help when I’m plugging generator into the regular home outlet?
hello
i would love to see a video on dewinterising your rv and also to cleam all water tanks.
thanks
Nicole
A great video for this newbie, but it did leave me with a question, especially after also watching the dump station video you posted. In the dump station video you hooked in a Rhino Blaster to wash out the black tank. In this initial set up video, the Blaster was not included in the sewer connections. Should I not use one when hooking up at a site? Thanks for any guidance you can offer as we get ready to go exploring in our first RV! The videos are great, extremely well done, and very helpful.
Hi Lew,
We don’t recommend using the Rhino Blaster with a fresh water drinking hose or supply line…even though the Rhino Blaster has a back flow valve it’s best just to use it at the dump station with a non-potable water supply.
Hope that clears it up!
Mike
Hello, nice video and have a question. If you have only a 12v ref ridge do you need to level? Also something I do is time how long it takes me to back up and hook up. I am at 9minutes for the fastest set up. How come? Because of bugs or late dark. And fun to watch others. LOL I will see how it goes and maybe even share some of my tips. I liked the idea of a two part water filter. I use the O2 green. Good luck Suzan and Mike Safe Travels Larry
Your second item on the setup list should be verify you can make connection to sewer, water and electrical.
I didn’t last time out and ended up 2’ short for sewer needed to remove jacks and reattach to truck to move forward 3-4’.
As usual great information for newbies like us.
Thank you
Chuck and Sharon