Thanks for your support! If you make a purchase using our links in this article, we may make a commission. And, as an Amazon Associate, I earn from qualifying purchases. See the full disclosure here.
Camper maintenance is the best way to keep its value and prevent damages. Therefore, we’ve provided you with 9 easy tips for cleaning your RV rubber roof.
Over time, oxidation will begin to destroy your roof. When this happens, water seeps into your ceiling, walls, and any electrical components in between. As you may know, water and electricity are not friends, potentially causing you hundreds of dollars in repairs. Connections may burn out, thus ruining your outlets. Or you may be putting yourself or others at risk for electrocution.
Water damage is also dangerous for your health, as persistent moisture and humidity encourage mold formation. This growth causes allergies, germs, and a persistent, lingering odor. Breathing in these spores may increase breathing issues and feelings of sickness. It will also depreciate the cost of your RV and deteriorate the inside.
By taking precautionary measures, you can easily prevent or reverse this process. For example, properly cleaning and treating the area prevents breaks, leaks, and mold growth. A thorough clean takes time but proves well worth it in the end. To achieve best results, tend to your RV roof frequently and with detail.
Types of RV Roofs
Before buying your camper, you should always inquire about its type of roof. Weak roofing material promotes tears and breakage, which invites water to seep into the cracks. Water damage occurs quickly and is one of the most challenging problems to fix, as it often results in mold and wears away the interior. Having a durable, sturdy RV roof prevents these issues and ensures a long-lasting experience.
These RVs roofs are wooden boards covered with a layer of rubber made from either ethylene propylene diene monomer (EPDM) or thermoplastic olefin (TPO). Although they are both made from rubber, each has distinct features and have separate maintenance routines.
EPDM is one of the most common and reliable RV roof materials. It generally goes by the name of “synthetic rubber,” and many manufacturers use it in their design. An EPDM rubber roof is much cheaper, resists UV-light better, and has increased durability compared to its “natural” counterpart.
This type of rubber is used for flat roofs due to its strength, making it best for RVs specifically. EPDM is not only resistant to water but also prevents chemicals from mixing with the liquid. Depending on the type of roof, moisture can mix with toxic substances causing damage and potential toxicity. Avoid this issue by choosing only an EPDM rubber roof and regularly washing it. With their low maintenance and easy cleaning, anyone can effortlessly maintain their RV rubber roof.
TPO is becoming increasingly popular in the RV world. Some say that it may eventually outrank EPDM due to its preferred features. TPO roofing deflects sunlight, which reduces heat absorption. Keeping your RV cool puts less strain on your air conditioner and cuts down on your energy usage. Furthermore, it is also durable and highly resistant to mold, dirt, and rips. TPO is the economical and efficient version of the polyvinyl chloride (PVC) roofing. It differs from plastic PVC material, as TPO is rubber-based. Maintenance is relatively simple if you follow the proper guidelines.
Why is it Important to Clean an RV Rubber Roof?
Regular roof cleaning rids dirt and grime while extending its value. Exposure to rain, water, ice, and other outdoor elements deteriorates rubber over time. As the roof weakens, it becomes more susceptible to cracks, rips, and caulking separations. Moisture can eventually enter these crevices and cause expensive repairs.
Whether it’s your house, apartment, or camper, water damage occurs just about anywhere. Wetness destroys electrical and mechanical components in your RV, meaning you will have no choice but to replace them. Damp areas also eventually turn into black mold and fungi, which can cause health and respiratory issues.
Parking in shaded areas increases the risk of mold or mildew formation. Staying under trees also poses an issue, as falling fruit and seeds promote roof moisture. Instead, keep your rig in sunnier areas as much as possible to dry the rubber and keep it clean.
Furthermore, RV insurance does not cover most water damage. So, properly cleaning your RV roof at least four times a year is cost-effective and prevents these expensive damages. If you live in a highly polluted area, you should clean your RV more often to guarantee clean rubber.
9 Easy Tips for Cleaning Your RV Rubber Roof
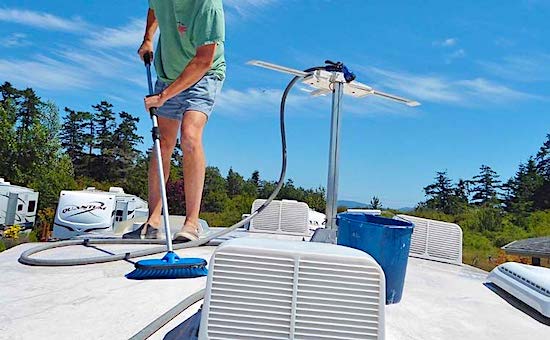
1. Ensure Your Safety
Properly cleaning your RV roof means climbing atop the rig and performing manual labor. This process is already dangerous, but when you add soap and water to the mix, it becomes especially hazardous. Slipping and falling can be life-threatening and typically ends with a trip to the hospital.
For this reason, always use a spotter and make sure they keep an eye out. Use a secure ladder and double-check that it is stable against the RV. Hoist your cleaning supplies, bucket, and brush up using a rope. Only wear gripped shoes and never walk across the wet surface.
RELATED READING: Also, there are correct and incorrect places to walk on an RV roof. Check out my article called Can I Walk On My RV Roof? for more info and a video about how and where you can walk on an RV roof safely.
2. Sweep and Thoroughly Inspect the Roof
Climb onto your roof and sweep any excess debris off. Now is the perfect time to examine for mold, mildew, sap, or any other contaminants. Also, check the caulk and seams for leaks or breakage. Fix these problems right away to avoid further damage.
3. Rinse Your RV Roof Before Cleaning
Use a hose to rinse and remove loose dirt and grime. For exceptionally dirty roofs, cover the sides of your RV with plastic to prevent dirty water from dripping down and staining.
4. Choose Your Brush According to Needs
A long-handled sponge mop is preferred to remove dirt and grime. This extension gives you the option to stand on the ladder, so you do not have to worry about slipping off the roof top. Use a medium bristle brush for general cleaning, as it will remove most of the filth. For tougher stains, use a soft bristle brush to scrub the specific area.
5. Only Use Approved Non-Corrosive Rubber Roof Cleaners
When choosing a rubber roof cleaner, remember that petroleum distillates destroy latex and may void the warranty. Swelling, sections of uneven thickness, and loose spots occur following direct contact. These effects happen because the chemical loosens the adhesives, which causes the roof membrane to swell. Using any other abrasive cleaners and acidic or citrus solvents increases the likelihood of corrosion, as it strips the rubber.
Only use cleaning chemicals that are free of petroleum distillates to maintain the integrity of the roof. Refer to the owner’s manual or manufacturer to find the best soap to clean your RV. Examples of safe chemicals include high-quality cleaning brands or mild laundry detergent diluted with water.
For sap residue, add mineral spirits onto a soft bristle brush and rub it into the area. If you spot mold or mildew, dilute bleach or vinegar (not together!) with water and scrub.
6. Clean the Rubber in Sections
To ensure safety, always clean your RV front to back. This way, you can climb off the ladder without stepping over the wet, slippery surface. Using a spray bottle, cover a 3-foot by 3-foot area. Then, use your brush of choice to clean in a circular motion. Apply moderate pressure, but not too much, as you do not want to hurt the rubber. Rinse off the dirt in the bucket and continue mopping.
7. Rinse Thoroughly to Prevent Residue Buildup on Roof and Sidewalls
After cleaning, rinse thoroughly to remove any extra dirt and grime. Be especially mindful of the roof sides and walls to prevent residue buildup. Failing to hose down these areas properly can cause further issues.
Also, be cautious not to slip and fall off the wet roof. As previously stated, cleaning front to back is much safer. While climbing off, do not trip over the vent or air conditioner, as this may be treacherous.
8. Repeat the Technique Until the RV Roof is Clean
With regular cleanings, you should only have to clean your RV roof once. However, if you haven’t cleaned it in a while, it may take a few times. Although it can be a bit labor-intensive, it is well worth it in the long-term. Avoiding leaks and water damage is cost-effective and maintains the quality of your RV.
9. Clean Your RV Roof at Least Four Times a Year
Being thorough and cleaning your RV roof often makes the process much more pleasant. Therefore, you should tend to your roof at least four times a year. Those who live in highly polluted areas or keep their RV under trees should clean the RV more often. Inspecting your roof also gives you the chance to fix any potential maintenance issues before they ruin the rubber.
How to Treat RV Roof After Cleaning
Treating your RV roof after cleaning is one of the most significant determinants of residue buildup. RV Roof Treatments protect against the sun and prevent oxidation. They also contain chemicals that resist contaminants like droppings from trees and animals, as well as dirt and grime.
Purchase EDPM and TPO safe protectants either online or at your local RV supply store. Inquire about products that are free of corrosive chemicals to prevent any mistakes.
Apply the roof treatment just after cleaning your RV roof. You will need about 16 to 20 ounces to cover the entire area. Spray in 3-foot by 3-foot sections and spread with a clean, damp sponge mop. Continue this process until you coat the whole roof. It needs 24 hours to air dry completely.
RELATED READING: For info about how to clean the whole outside of your RV or Camper trailer check out our article How to Clean the Outside of a Camper Trailer.
Conclusion
Like anything, correctly maintaining your RV increases its lifespan and prevents further issues. Protect your investment by choosing a rubber roof and giving it a routine, thorough wash. Also only choose safe, non-corrosive brushes and cleaners.
The entire cleaning process takes about 45 minutes to an hour and a half, which is much less expensive and time-consuming than repairing a water-damaged RV.
Hopefully, these 9 easy tips for cleaning your RV rubber roof have taught you how to wash your rig thoroughly. Now, get cleaning!
For more info about cleaning your RV check out these articles too!
- Can I Wash My RV with Dawn Dish Soap?
- Can I Walk On My RV Roof?
- Homemade RV Awning Cleaner
- How to Clean the Outside of a Camper Trailer
- Should I Pressure Test My RV for Roof Leaks?
- 21 Must Have RV Accessories for a New Camper or Travel Trailer
- Can I Use Flex Seal on My RV Roof?
Do you have any tips to add about how to clean your clean your RV Roof? Please leave your comments below. You never know but your comment may help a fellow RVer!

I’m glad you said that cleaning your RV roof properly requires getting up on the vehicle and engaging in manual work, which is already risky, but adding soap and water to the procedure makes it much worse. Okay, this is perfect because I really want to get some good trailer cleaning equipment as my rig’s been through some messy adventures lately, and it’s starting to look pretty rough. I figure it’s time to give it a good scrub and make it shine again. Plus, a clean trailer just feels good to roll with on the open road.
What about Dawn detergent? I seen where they say Dawn will clean just as well also and it gets a lot more dirt and grime off. I just used Dawn on my fifth wheel roof and hope I made the right choice. Your thoughts ?
Thanks for your information you provided. I am using B.E.S.T. 55048 Rubber Roof Cleaner to clean my rubber roof. I had been parked under an oak tree then a maple tree and I wanted to clean it up before winter.I picked a cool fall partly cloudy day to tackle the project.I diluted the cleaner as per instructions and started to clean.This stuff works great it lifted 90% of the stains with a small amount of effort.
Thanks for sharing! This procedure really works!
Roofing work can really be crucial, seasonal, and more often needs professional help but it can be prevented from risks too with knowledgeable DIY tips. Thanks for this!
Mariella
Hi Mariella,
Glad you liked the tips and I hope they help save you a few bucks!
Mike