Thanks for your support! If you make a purchase using our links in this article, we may make a commission. And, as an Amazon Associate, I earn from qualifying purchases. See the full disclosure here.
Updated August 5, 2025
Maintaining your RV’s black tank doesn’t have to be a dread-filled chore. With a few smart habits and simple tools, you can keep your system working well and smell-free throughout your travels.
1. Use the Right Toilet Paper + Water Amount
- Stick with septic‑safe, single‑ply or RV-specific toilet paper that breaks down easily. The shake‑test (dropping paper in a jar of water and shaking it) helps verify compatibility.
- Always flush with extra water, even for liquid waste. A generous flush helps solids stay submerged and prevents buildup.
2. Let the Tank Fill before Dumping
- Don’t dump too soon—allow the black tank to fill significantly before opening the valve. This ensures there’s enough liquid to “swoosh” solids free. Dumping too early leads to solids sticking to the bottom and buildup.
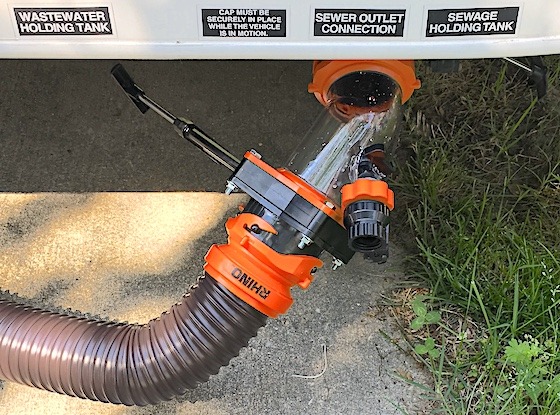
3. Rinsing Your Tank Effectively
Standard Flush Options:
- Built-in black tank flush: Convenient but often low pressure. Useful for léger maintenance, but not heavy-duty cleaning.
- Manual rinse: Use jerry cans or a portable water container to pour about 15–20 gallons through the toilet. It’s more controlled and effective at moving sludge.
Deep Clean Methods:
- Tank cleaning wand (e.g. Valterra Master Blaster): Insert into the toilet and spray high-pressure water inside the tank. This breaks up stubborn build-up.
- Professional service like Kleen Tank or honey-wagon operators: These use industrial-strength cleaning to remove scale, restore sensors, and eliminate odors. Ideal once a year or after heavy use.
4. Use Quality Tank Treatments + Keep Water in the Tank
- After cleaning, pour 1–2 gallons of clean water into the tank along with a septic‑safe tank treatment such as Matt’s Liquified to keep waste suspended, reduce odors, and protect sensors.
- Never let your tank sit completely dry after dumping—add a little refill water to prevent residue from hardening into a “concrete” mess.
5. Avoid Mythic “Hacks” — Ice & Soap Don’t Replace Rinsing
- Ice cube method: The idea of tossing ice into the tank and driving around to scrub away buildup is largely ineffective. Ice melts fast and only dents surfaces minimally, if at all.
- Dish soap + water-softener (Geo method): Although it may promote slipping inside the tank, it won’t eliminate solid waste or stubborn clogs. Real flushing is required.
6. How to Tell if Your Tank Is Clean
| Method | What to Check |
|---|---|
| Water clarity | Rinsing should shift from cloudy or brown to clear. |
| Visual inspection | Shine a flashlight straight into the toilet: no solids or pyramids. A wet tank bottom is a good sign. |
| Sensor accuracy | Even after rinsing, sensors may misread if gunk remains. Don’t rely on them fully. |
| Odor check | If smells linger, repeat rinsing or schedule professional cleaning. |
7. Best Practices for Boondocking & Long Trips
- Don’t empty your tank at short stops. Wait until you’ve accumulated enough liquid for a strong, effective flush.
- Travel with a small amount of refill water and enzyme treatment onboard—this keeps everything active and ready for thorough dump stations.
8. Common Mistakes to Avoid
- Relying entirely on built-in flush systems—they usually don’t provide strong enough flow for deep cleaning.
- Ignoring sensor inaccuracy—many users default to “time-based dumping” rather than trusting tank levels.
- Overusing harsh blue chemicals—these may smell strong, but they can harm campground septic systems. Opt for septic‑safe options.
9. When to Hire a Pro
Consider professional cleaning if you experience:
- Persistent odor after flushing or treatments
- Stubborn clogs or resistance during dumping
- Sensor readings stuck at full even after rinsing
- Buildup visible under flashlight inspection
Annual professional cleanings (e.g. Kleen Tank or honey-wagon services) are worth the investment for smooth, odor‑free RV life.
✅ Final Takeaways
- Always use plenty of water every flush
- Flush only when enough liquid is in the tank for effective release
- Skip hacks—real rinsing and enzyme treatments are reliable
- Inspect visually, don’t rely solely on sensors
- Refill tank after dumping to prevent dryness
- Call professionals when needed to restore cleanliness effectively
🔹 Frequently Asked Questions
1: What’s the best way to clean an RV black water tank?
Use a combination of flushing with lots of water, enzyme-based tank treatments, and manual rinsing with a tank wand. Avoid relying solely on built-in flush systems.
2: Can I use bleach to clean my RV black tank?
It’s not recommended. Bleach can damage seals and kill beneficial bacteria in your treatment products. Use RV-safe cleaners instead.
3: How often should I clean my RV black tank?
After every dump, do a quick rinse. Every few weeks—or after a long trip—do a deeper clean with a wand or professional service.
4: What’s the best toilet paper for RV black tanks?
Use single-ply, septic-safe, or RV-specific toilet paper. Do the “shake test” to confirm it breaks down quickly in water.
5: Why do my tank sensors read full even after dumping?
Residue buildup can block sensors. Regular deep cleaning and enzyme treatments help restore accuracy.
With this refined routine, black water tank maintenance becomes a manageable part of RV ownership—so you can focus on adventures, not messes.
Related Reading:
– What Are RV Holding Tanks and How Do They Work?
– Can I Dump RV Tanks at Home?
– How to Combine RV Black and Gray Water Tanks
– Is Special RV Toilet Paper Really Needed in an RV?
Mike Scarpignato – Bio
Mike Scarpignato founded RVBlogger.com with his wife, Susan, in 2018 to help new and experienced RVers make better decisions about buying, owning, and traveling in an RV.
Mike has decades of camping experience and has traveled extensively in both a Gulf Stream Conquest Class C and a Thor Challenger Class A motorhome. He and Susan spend much of the year on the road, attend RV shows, visit dealerships, and tour RVs across the country.
Through RVBlogger.com and the RVBlogger YouTube channel, Mike shares practical, first-hand advice about RV buying, floor plans, ownership, maintenance, gear, campgrounds, and the RV lifestyle.

I have this problem with my rv, when I open the water the sigs and toilet flush ok, but the bath tube the water do not want to flush out the water because any time I use the water all the water goes in to my bath tube and stay there like block
In a 2/3 full black tank, add a 10 pound bag of ice, then drive around. That has cleared our sensors before.
I’m an experienced RV’er and have been RV’ing since 1975. I’ll just add a few ideas I have picked up over the years. First of all, don’t empty your black tank each day if you are staying multiple days at a campground. Connect your hose and keep both tank valves closed. (You will use the grey water to wash the hose when dumping.) Keeping the black tank closed and only dumping every few days or more will allow more water to build up in the tank. I would recommend opening your grey tank first for a few seconds to be sure you have no leaks. Close it, dump the black water, close the black valve, open the grey valve and dump the sink and tub water. This contains soap and will help wash the drain hose. When you return home after a trip, use the wand to fully clean the black tank after dumping. I put chemical in everyday to avoid odors and break up black water contents. Always keep a little water in the toiler over the flush valve. Most importantly, be sure you check all connections well and tug on them a little bit to assure everything is going to work prior to draining tanks. One time, one of the teeth on my dump hose connection broke. This allowed the entire black tank to dump all over the ground. We use Angel Soft toilet paper which can be purchased at Walmart. It is cheaper, easier to obtain, and better quality than RV paper. It biodegrades just like RV paper. If a little undisolved paper washes down your hose into the sewer at the dump station, don’t worry about that. After all it is going into a sewer or septic tank. While I am draining tanks outside, my wife cleans the toilet and puts in the chemical in the toilet. Another tip I use is to lay out a rug before connecting the hose, then moving it prior to draining. (It help save the knees.) Finally, install a sewer cleanout in your lawn where you can easily drain your hoses at home. It should be near a driveway. Happy RV’ing!
Thanks! Had a tent trailer for years and just stepped up to a 2021 keystone Cougar 29BHS. very intimated by all the bells and whistles, especially the toilet maintenance. Going to watch and buy the products you suggest Mike!
Question…
When black tank is flushed, cleaned and sanitized do we put some water back in it or let it sit dry if it’s going to sit for awhile? We live in Florida so we really don’t have to winterize it.