Thanks for your support! If you make a purchase using our links in this article, we may make a commission. And, as an Amazon Associate, I earn from qualifying purchases. See the full disclosure here.
Should you level RVs with slides in or out? We see this question pop up every now and then in our private Facebook Group called RV Camping for newbies.
One of the most important tasks when setting up camp is to level your RV. Not only does it ensure your comfort, but it also helps protect your RV from wear and tear. That being said, it’s important to do it correctly.
Thankfully, we have the answers to all your questions. In this article, we’ll tackle the importance of leveling your RV, and how to do it the right way.
4 Reasons It Is Important To Level Your RV?
Besides the fact that you don’t want to be the site everyone is pointing at with the leaning RV, there are important reasons to have a level RV.
Getting it right when you first arrive is key to an enjoyable stay. Taking the time to get level and set up on good jack pads to ensure you stay level gives you the rest of the weekend to relax.
1. Reduce Stress On Your RV
Perhaps the most important reason is to reduce stress on your RV. If weight is unevenly distributed, it can put excess strain on the RV’s frame and other components. This can lead to serious damage to your RV in the long term, meaning potentially expensive repairs.
This is especially the case if using slide-outs. If you don’t level your RV, an extended slide can seriously unbalance the RV, leading to increased pressure on the frame.
2. Proper Water Drainage
You also need to level your RV in order for water to flow properly through your water system. Otherwise, an uneven RV will cause water to pool where it shouldn’t. Like in your shower!
This can also prevent your tanks from draining properly and prevent your tank sensors from working accurately.
3. Refrigerator Function
Leveling your RV is also important for your RV kitchen for two reasons. For one, if your RV isn’t level, drawers and cupboards won’t open and shut correctly, and may even open on their own. But more essentially, it can also negatively impact the function of your RV fridge.
If you have what is commonly called an “absorption fridge” or a “two-way” or “three-way” fridge, it will not work properly unless it is level. This is because the fridge requires an ammonia and water solution to properly flow, and if the fridge isn’t level, your fridge and freezer may not cool properly.
4. Comfort
Finally, leveling your RV is important for your comfort. An uneven RV means things will slide off counters, and you may even have trouble balancing as you move around the RV.
A good example of this is one time we were not level we actually had a cup slide across the countertop and into the kitchen sink. The cup had water and ice in it and when condensation formed on the outside of the cup the condensation allowed the cup to slide on its own. We thought we had a ghost in the rig for a minute until we figured out what happened!
Plus, moving around will cause more movement in the RV if it isn’t level. On top of all this, an uneven RV simply looks bad.
The importance of a level RV is not often challenged, unlike whether or not to level RVs with slides in or out.
Should You Level Your RV As Soon As You Get To Your Site?

The absolute first step will be to check the site and to ensure all hookups are working properly. But after that, you’ll want to level before you address anything else.
We learned the hard way that there is no sense in getting all leveled up, and then extending our slides only to discover there is a problem with the electrical hookup.
After all, once you’ve connected everything to your RV, you aren’t going to want to have to move it around. Plus, manual leveling isn’t most people’s favorite task once they arrive at a campsite, so it helps to get it out of the way quickly. Auto levelers make this chore much easier.
On top of this, during leveling, you might find your site is very uneven. Leveling before anything else helps ensure you’ll catch this so that you can address it right away.
I bring this up because levelers aren’t always able to level your rig if the site is very unlevel. In this case, you may need to manually drive your RV onto blocks to get as level as possible and then deploy your levelers on blocks as well. You definitely want to do all of this before you do any other part of your setup process.
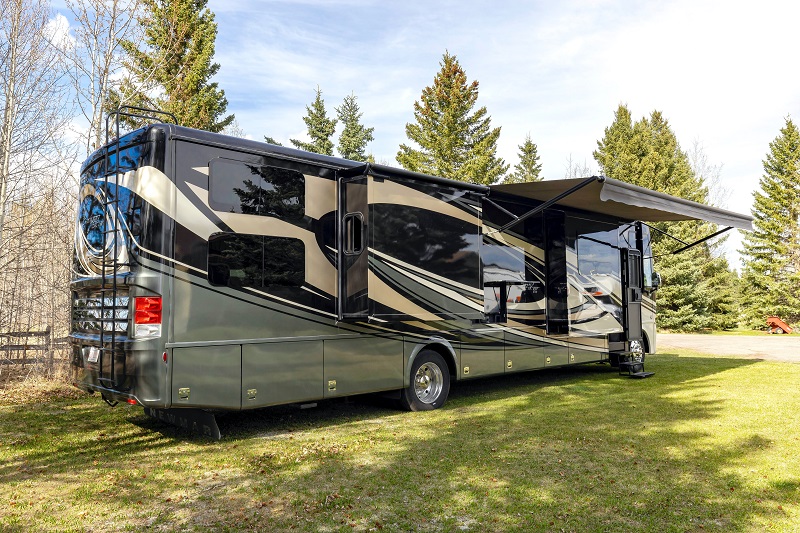
Should You Level RVs With Slides In Or Out?
A common question is whether you should level RVs with slides in or out.
In fact, there is some debate here, with people in both camps. But overall, the general consensus is to level RVs with slides in: not out. In our experience, we recommend leveling up your RV before extending your slides.
There are a couple of reasons for this. First, extending your slides before your RV is level can put stress on the slide components. Secondly, leveling with the sides out can be tricky as you may have to get to the wheels and jacks if you don’t have auto levelers.
However, some argue that it’s better to extend the slides first, because some RVs tilt in one direction after extending the slide, ruining your leveling. That said, in cases like these, we recommend compensating for that tilt when leveling the RV and then extending the slides.
Some people also like to check their clearance on a tight side by extending the slides before doing anything else. If you do this, we recommend extending them to check, then retracting them to level.
We recommend measuring the distance between your RV and a tree with a tape measure rather than extending the slides to check.
Should You Level Your RV Side To Side Or Front To Back First?

Another common debate is whether you should level your RV side to side or front to back first.
If you manually level your rig, you’ll want to level side to side first. This is because side-to-side leveling will require you to move the RV. So, it’s usually simpler to do side-to-side leveling first, then move to front-to-back leveling.
However, if your RV has a major lean in one direction, whether that be front to back or side to side, it’s usually smart to deal with that first by using blocks under your tires or jacks. This will make the rest of the leveling process simpler.
Also note that if you have an auto leveler, you don’t usually have to worry about this. Simply press the button, and your RV will handle everything on its own.
Do RV Auto Levelers Work?
If you’ve seen RV auto levelers you might wonder, do they actually work?
In fact, RV auto levelers not only work, they work extremely well and are super convenient.
Simply press a button, and your RV will handle all the leveling on its own without a single thought on your end. The auto leveler automatically measures everything and finishes the process in only a few minutes.
Auto levelers are way simpler than manual leveling using things like Andersen levelers and blocks and having to adjust jacks the old-fashioned way. Nor will you need to manually check if you’re level throughout the process.
At worst, an auto leveler may need to be calibrated from time to time. Thankfully, this is a fairly simple process that only requires a few minutes and a few button presses.
Insider Info!
We have some inside information that Liquid Spring has added an auto level function to their suspension system. Mike and Susan are getting it installed on their rig, so stay tuned for the details!
What Do You Do If Your Slides Get Stuck Out?
Although it’s not the most frequent occurrence, sometimes, slides can get stuck in the extended position. This can happen from repeatedly leveling your RV with the slides out.
In some cases, people even end up driving away without retracting the slide, which can put both the RV and other people around it in danger.
Thankfully, a stuck slide isn’t usually too difficult to fix.
Typically, slide-outs will have a manual override to move them without the motor. The exact method to find and use this override depends on your type of slide-out.
Let’s take a look at some common types and the general way to override each. Remember, each RV is different so if you run into this problem you should refer to your owner’s manual.
If you are ever bored, spending some time figuring out how to manually retract your slides isn’t a bad idea. Having to figure it out at checkout isn’t as much fun.
Cable Operated
To find the override for a cable-operated slide like the Accu-Slide, you’ll need to first find the motor, which is typically on the top center of the slide-out.
You may need to remove the interior fascia in order to access it. Once you’ve found the motor, you’ll use a drill to manually retract the slide.
Worm-Gear Operated
For Schwintek slides, AKA worm-gear slides, you’ll need to disengage the drive motor. This sounds bad, however, a single screwdriver or even a pen in an emergency is all you need.
Rack-and-Pinion Operated
There are two types of rack and pinion slide-outs, with slightly different methods to override them.
For slide-outs with an extension rod running from the motor through the I-Beam:
- Locate the extension rod
- Unhook the battery
- Connect your manual override crank to the extension rod
- Turn clockwise until you feel resistance and the slide is flush with the RV wall. Avoid over cranking.
For slide-outs with a hex nut attached to the electric actuator motor:
- Find the hex nut on the motor (this requires you slide under the RV to access, and in extreme cases, may require cutting a hole in the RV underbelly)
- Using a ratchet with an appropriately sized fitting, turn the ratchet clockwise until the slide is flush.
Level RVs With Slides In Or Out? Final Thoughts
The leveling process is essential, and shouldn’t be rushed or skipped. It ensures you’re comfortable in your RV, that all your systems function properly, and that you aren’t putting undue strain on your RV’s frame.
Leveling should be the first thing you do at your campsite after you confirm the hookups are working properly. Generally, it’s recommended to level side to side first, then front to back, and to keep your slides retracted until you finish.
With your RV perfectly level, you’ll be free to kick back and enjoy some RV time, without anything rolling off the table.
Related Reading:
– 5 Best RV Leveling Apps For Your RV
– How Much Weight Can An RV Slide-Out Hold?
– Should You Store Your RV With The Slides In Or Out?
– RV And Travel Trailer Bubble Level Installation Guide
– Best RV Jack Pads To Level And Stabilize Your RV
Ryan Milejczak – Author and Part-Time RVer
Ryan Milejczak (mill-LAY-check) is a full-time freelancer writer and Florida native with a passion for RVs.
Ryan has been writing about RVing and sustainable living for the past 3 years while traveling.
Currently, he’s saving up to do his own camper van conversion, which he plans to take across the US and Mexico.
When he’s not writing, Ryan loves cooking, hiking, practicing his Spanish, and taking care of his plants (currently at 23 plants and counting!)